Category:User module
User module
By default there will always be at least one user in a new system. For if there are no users in a system it will not be possible to log in to create other users.
The place where you create new users is via the User module, which can be found in the Tools menu under HR. The first page you will see will give you a resource list page displaying users. The resource lists of Catglobe all work in similar ways so please refer to the Managing Resources chapter for more information on how to find the exact user you are looking for.
There are a number of links/actions we can choose. We can
- Create new users
- Edit current users
- Edit resource access
- Edit access to the user resource
- Edit access to navigation functions for the user
Delete user
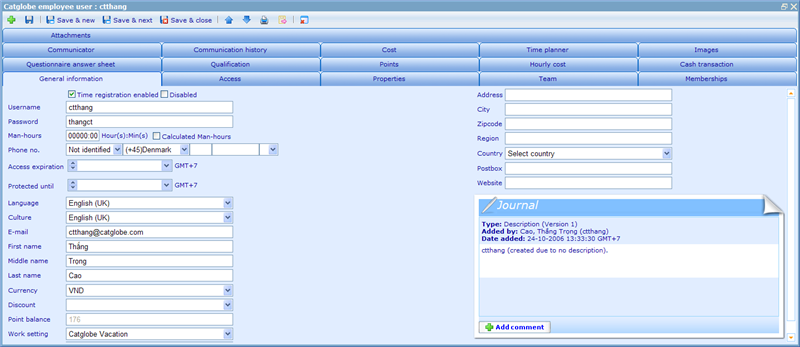
Once we open the user resource dialogue we will be presented with the general information tab.
Let us go through some of the information on this tab and what you should insert.
Time registration enabled: If you want to registered time that you have used on servicing this specific user, you need to make it possible to find him via the time registration interface. This can be done via checking this field.
Disabled: If an employee stops with you, if a respondent no longer wishes to be contacted, or is a client should no longer have access; then you should disable him using this check-box. Generally we advice you to never delete users, since the interaction you have had with them has a historical significance. Disabling users is a much better way to ensure that their information is kept, but that we avoid using them for samples, including them in activities where they should not participate, send them e-mails they should not receive, and much more. We will discuss in details in other help files how different modules enable you to include or exclude disabled users as appropriate to the situation.
Phone no.: Here you have the possibility to add phone and fax numbers belonging to the user. Use the first drop down to choose the type of fax or phone you want to see or add, choose the second drop down to specify country code for the number, choose the third field for area code, fourth field for subscriber number, and if the number needs an extension specify it in th last two fields. If you do not know what type of number it is you have from the user you can choose “Not identified” in the first drop down.
Access Expiration: If you know that an employee or client should no longer have access to your Catglobe site after a certain date, then you can specify an access expiration date in this field. This is different from disabling the user in that it merely restricts the user accessing the site, rather than seeing him as a user we can/should no longer contact. The field is especially relevant when clients pay for access to e.g. reports for a certain duration of time.
Protected until: This date makes it possible for us to protect a user from being included in groups built until a certain date. Please read the files on the group builder for more information.
Language: The language chosen for a user will specify what language he sees Catglobe in when he logs in. Please be advised that if a users language is changed he needs to log out and in again to see Catglobe in the new language.
Culture: The culture chosen will specify the format in which users see decimal notations, date formats, and similar syntax that is different between countries and cultures.
E-mail: This address is the location to which auto-generated mails for the user will be sent.
Currency: The currency specifies the initial currency that will be shown to a user viewing the shopping module.
Discount: Different discount schemes can be devised, and users can be granted these by choosing them in this drop down. Please refer to the training material on the shopping module for more information on setting up discount schemes.
Points balance: The number of points that users have. This cannot be edited in this field. To add or remove points manually from a user you can open the “Points” tab of the user.
Work setting: This drop down lets you choose a work setting scheme that will influence the way that holidays and weekends are shown in your time registration overview.
Pages in category "User module"
The following 4 pages are in this category, out of 4 total.
