Parameters: Difference between revisions
More actions
jrfconvert import |
No edit summary |
||
| (6 intermediate revisions by 2 users not shown) | |||
| Line 1: | Line 1: | ||
= Parameters<br> = | |||
The parameters feature helps store additional data about a resource that are not available in the normal interfaces. The following resources can have parameters applied: | |||
*Monitor | |||
*Folder | |||
*Group | |||
*Paper questionnaire | |||
*Products | |||
*Project | |||
*Questionnaire | |||
*Report | |||
*Task | |||
*User | |||
In order to apply parameters to resources you need to take the following steps: | |||
From the “tools” menu in the lowest left corner of your screen, select ''Administration -> System -> Parameters''. | |||
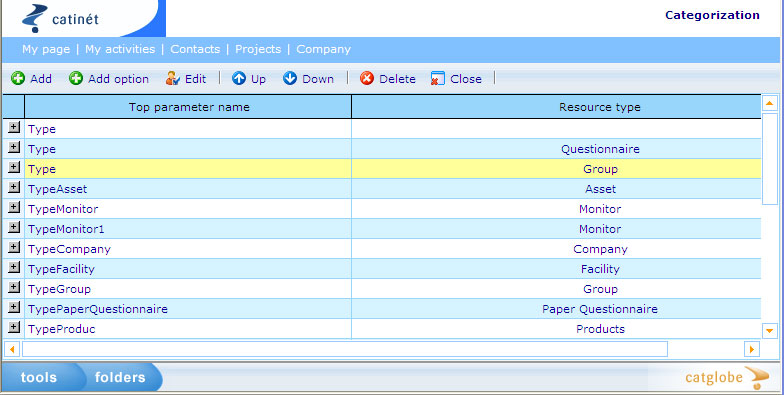
You will be presented with an interface similar to the one shown in the image below: | |||
[[Image:1338.jpg|784px|Categorization 1]] | |||
This interface shows all the parameters which are available in your system as you can see in the first column. All these parameters are of level 1. In each parameter, there might be options. The second column indicates the resource type of each parameter. | |||
*If you want to add a new parameter you should click the “Add” button. | |||
*If you want to edit a parameter you should highlight it in the list and click the “Edit” button. | |||
*To open a parameter, click the cross button at the beginning of the record, you will be presented with the options which are designed for the parameter. | |||
*To change the order of the options, you can use the “up” or “down” arrows. | |||
*To delete a parameter, highlight a record in the list and click the “Delete” button. There are no restrictions on deleting parameters. | |||
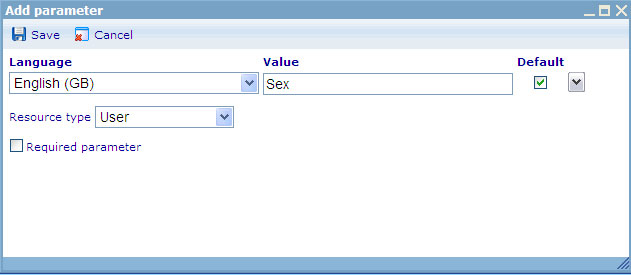
When you would like to add or edit a Parameter, you will be presented with a dialogue which looks similar to the following: | |||
[[Image:1339.jpg|631px|Categorization 2]] | |||
We will first describe the choice of language. Since a parameter can be seen by users speaking many different languages we will also need the flexibility to show the parameters in different languages. If users log in that are stated to have a different language than the ones for which you have specified values, they will be shown the default language value. The default value is chosen by clicking the “default” check box on the right. | |||
In this dialogue you must give your Parameter a name in a specific language in the “value” field. Then you must select a resource type in the drop down to which the parameter belongs. Finally, if you want that at least one option of the parameter must be selected, you should can set the parameter to “Required parameter” by checking the check box on the left. | |||
You can also add a new sub-parameter to a parameter by opening it, highlighting a record of the immediate level, then clicking the “add” button. You will be presented with a similar image as above, but the resource type is set the same as the parameter of the immediate level. | |||
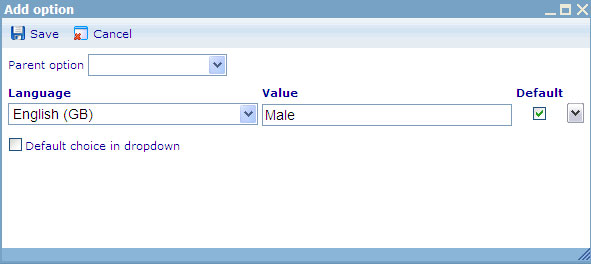
When you would like to add or edit an option to a parameter or sub-parameter, you will be presented with the following dialogue: | |||
[[Image:1340.jpg|591px|Categorization 3]] | |||
Similarly, you can choose the language and give the option a unique name. If it is an option of a sub-parameter, you need to select its parent option in the drop down. | |||
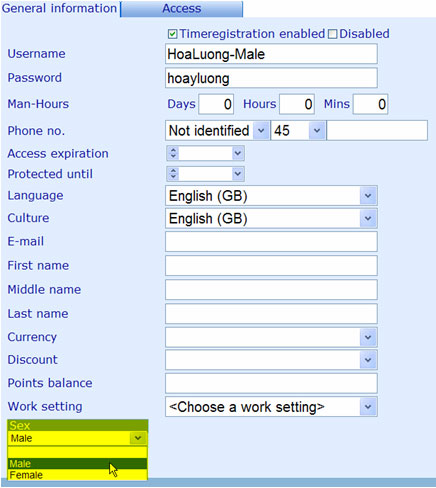
When you would like to create a new record for a resource type, you will be presented with a dialog which contains the parameter(s) and sub-parameter(s) you have added. For example, when you create a new user, you can select one option for the parameter “Sex” as presented in the image below: | |||
[[Image:1341.jpg|436px|Categorization 4]] __NOTOC__ | |||
[[ | [[Category:Managing_resources]] | ||
Latest revision as of 10:37, 30 January 2012
Parameters
The parameters feature helps store additional data about a resource that are not available in the normal interfaces. The following resources can have parameters applied:
- Monitor
- Folder
- Group
- Paper questionnaire
- Products
- Project
- Questionnaire
- Report
- Task
- User
In order to apply parameters to resources you need to take the following steps:
From the “tools” menu in the lowest left corner of your screen, select Administration -> System -> Parameters.
You will be presented with an interface similar to the one shown in the image below:
This interface shows all the parameters which are available in your system as you can see in the first column. All these parameters are of level 1. In each parameter, there might be options. The second column indicates the resource type of each parameter.
- If you want to add a new parameter you should click the “Add” button.
- If you want to edit a parameter you should highlight it in the list and click the “Edit” button.
- To open a parameter, click the cross button at the beginning of the record, you will be presented with the options which are designed for the parameter.
- To change the order of the options, you can use the “up” or “down” arrows.
- To delete a parameter, highlight a record in the list and click the “Delete” button. There are no restrictions on deleting parameters.
When you would like to add or edit a Parameter, you will be presented with a dialogue which looks similar to the following:
We will first describe the choice of language. Since a parameter can be seen by users speaking many different languages we will also need the flexibility to show the parameters in different languages. If users log in that are stated to have a different language than the ones for which you have specified values, they will be shown the default language value. The default value is chosen by clicking the “default” check box on the right.
In this dialogue you must give your Parameter a name in a specific language in the “value” field. Then you must select a resource type in the drop down to which the parameter belongs. Finally, if you want that at least one option of the parameter must be selected, you should can set the parameter to “Required parameter” by checking the check box on the left.
You can also add a new sub-parameter to a parameter by opening it, highlighting a record of the immediate level, then clicking the “add” button. You will be presented with a similar image as above, but the resource type is set the same as the parameter of the immediate level.
When you would like to add or edit an option to a parameter or sub-parameter, you will be presented with the following dialogue:
Similarly, you can choose the language and give the option a unique name. If it is an option of a sub-parameter, you need to select its parent option in the drop down.
When you would like to create a new record for a resource type, you will be presented with a dialog which contains the parameter(s) and sub-parameter(s) you have added. For example, when you create a new user, you can select one option for the parameter “Sex” as presented in the image below:


