Difference between revisions of "Category:The interviewer screen"
(Created page with "Category:CATI module =====The interviewer screen===== The interviewer screen is easy to use, but also has the flexibility to handle Interviewer decisions when required....") |
(No difference)
|
Revision as of 05:33, 12 May 2011
The interviewer screen
The interviewer screen is easy to use, but also has the flexibility to handle Interviewer decisions when required. When an Interviewer needs to go to work, he just logs in to his personal My Portal page, and on the home page he will see what CATI assignment(s) he needs to start working on.
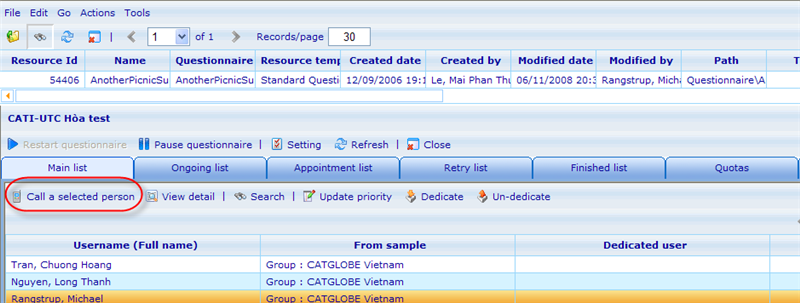
Another way to start interviewing is from the Fieldwork Manager. In the main or meeting list the supervisor can choose to highlight any user and click the "Call a selected person" button. This will start the interviewer screen as well.
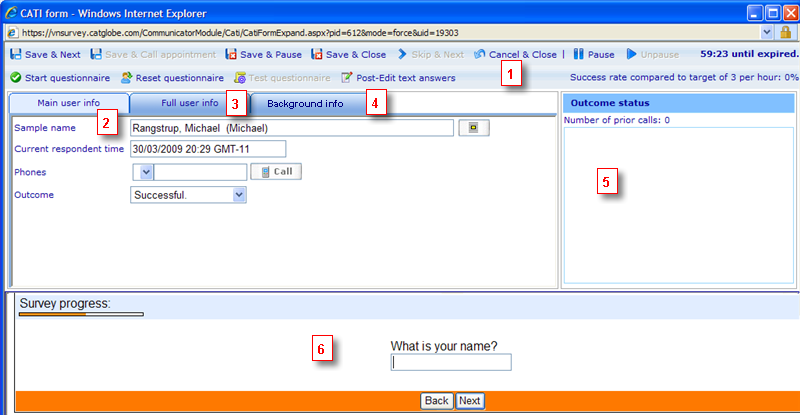
Once the interviewer (or supervisor) clicks on a CATI assignment he will be transferred to the interviewer screen. The interviewer screen looks like below and consists of four main areas.
Area 1: The tool bar holds the main actions the interviewer can carry out. Interviewers can here choose to start the questionnaire for a respondent, take a break by clicking pause, and carry on interviewing the next respondent. In the case where the interviewer by mistake started up an interview process he can also reset the questionnaire. If you would like to know more about the effect of pausing a questionnaire on the interviewers time registration, please refer to the description of the Activity Manager. Two other buttons you here have access to are "Test questionnaire" and "Post-Edit Text Answers". The first gives an interviewer the chance to test out the questionnaire that the users will be asked so he will be well prepared before an actual interview starts. The post editor makes it possible to clean up open questions after an interview has finished. You can read more on this by clicking here.
Finally a number of buttons make it possible to finish the current respondent and either stop or go to the next respondent. These are:
Save & next: The system will update the result of the interview and call the next respondent.
Save & call appointment: This button is only available if the CATI questionnaire has been set to 'Interviewer appointment self control or full control'. To read more on setting the appointment control please click here. When clicking this button a dialog showing appointments will open. The interviewer must then choose which respondent to call from the list and click the call button. It is also possible to search for specific appointments using the search button. Before calling an appointment you should always click the refresh button to make sure someone else has not picked it up concurrently.
Save & pause: The system will update the result of the interview and pause the working time of the current interviewer on this questionnaire. When clicked most of the functions on the CATI form are disabled. When the interviewer ready to work again, he or she will be click the “Un-pause” button to go back to work and receive the next respondent.
Save & close: The system will update the result of the interview and close the CATI form.
Skip & next: This button is just available when the interview time is expired. When this button is clicked, the system will skip this respondent and call the next one.
Cancel & close: The system will be canceling this interview, returning this respondent to the prior list (main list or appointment list), and close the CATI form.
Area 1 also provides two pieces of useful information. The first is the number of minutes until the call to the respondent expires. When an interview expires the respondent will automatically be moved from the ongoing list to the main list of respondents. So it is important that the interviewer observes this time and gets his interview done before the time runs out. The second piece of information regards the interviewers success rate for the questionnaire. The supervisor of the questionnaire will have decided on an expected number of successful calls per hour and the users actual performance compared to this target will be represented as a percentage value. If user gets 100% it means he is on par with the supervisors expectations. Higher numbers means a better than expected performance and a lower number a worse than expected performance.
Area 2: The respondent information area gives us all the necessary information on the respondent and also options on registering the outcome of the interview. There is also a button for adding more demographic information to the respondent (this may also be done directly in the questionnaire if so wished). Depending on the outcome chosen interviewers will get additional fields for registering e.g. comments on a set up meeting, precise meeting time (system tells you the difference between interviewer and respondent time zones when different), and comments on failed interviews.
Sample name: Full name and user name of the user being interviewedPhones: List of phone numbers of the respondent. You can use the drop down to find alternative numbers for user that have more than one phone numbers registered.Call button: Activated when interviewer has a 'softphone' installed and when the AsteriskEnabled web config setting is set to true.Outcome: List of contact statuses of the questionnaire. Click here to learn more on "choosing a contact status".
Area 3: This tab will only appear if activated by the supervisor of the questionnaire in the CATI settings dialog. The tab will show additional information about the user being called. What information depends on the settings specified in the earlier mentioned settings dialog.
Area 4: This tab will only appear if activated by the supervisor of the questionnaire in the CATI settings dialog. The tab will show imported background information about the user which does not exist in the main user information.
Area 5: The interview history area gives us an idea of what has earlier happened with this respondent in connection with this survey. This area will also display comments, so that it is easy to understand/recall how to approach the respondent.
Area 6: This is where we show the questionnaire of the respondent. The questionnaire is set up using the questionnaire module.
Pages in category "The interviewer screen"
The following 2 pages are in this category, out of 2 total.


