Creating weights
More actions
Creating weights
Once you click the 'Edit weights' button you will see a list of weights that currently exist for the data cache (if any). The dialog looks like below:
This list will show all the weight columns that exist for the data cache. You will have the following tool bar options.
Add: Create a new weight column for the data cache.
Update: Edit the selected weight column to update earlier specified properties.
Recalculate: Based on the data table of the data cache specification, do the calculation process again without modifying any properties.
View: View the properties of the selected weight column. You could in reality also view it using Edit, but since the Add/Edit features a wizard the view mode is much quicker and simpler when you do not want to change any information.
Delete: Remove the weight column from the data cache.
Close: Close the dialog.
The columns that you see in the list are:
Column name: The name you have given the weight column.
Number of variables: Number of variables used to calculate the weight column's values (please read further down to understand this in detail).
Totals: Population totals declared when creating the weight (please read further down to understand this in detail).
Add/Edit weight wizard
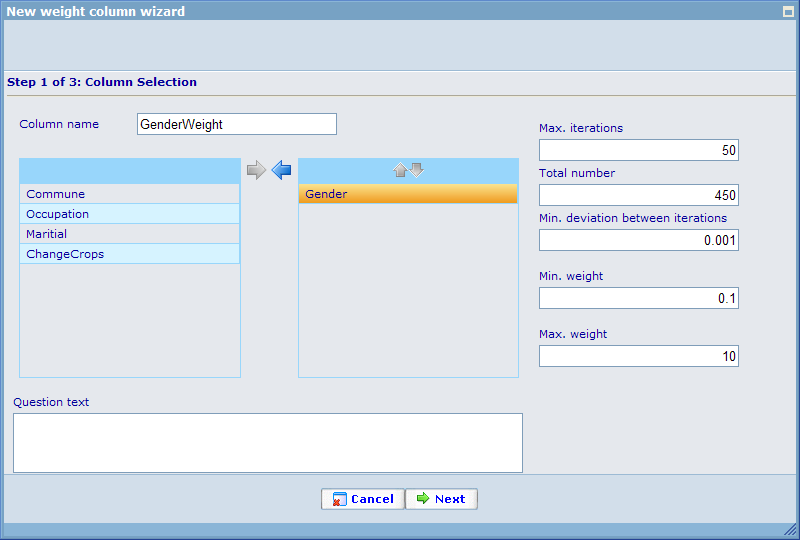
When adding or editing a weight we will open the weight wizard. Page 1 of this wizard looks like below.
You must initially choose a name for your weight and which columns of the data cache that will be used as variables in the weight calculation. Generally you will want to choose the columns that identify the groups of people whom you have not gotten the appropriate representation for. In the above example, which is used for a satisfaction survey, you will see that we will make a weight that uses 'Gender'. This is due to the fact we have identified that those who have answered the satisfaction survey do not appropriately match the mix of people that we have in the company on this factors. In step 2 you will see how we 'correct' this problem, but let us first look at the additional settings that we have for this weight.
Max. iterations: The way that weights are being calculated is through a number of iterations where the system closes in on the appropriate weight of each respondent in the data cache. The default number of iterations is set to 50 but can be increased up to a pre-defined number set in the configuration file for the system. In our experience the number of iterations needed for convergence is ranged from 2 to 30 and depends on how heavily unbalanced the sample was initially. Even though the default number of iterations is set to 50, the iterations will terminate as soon as convergence is achieved.
Total number: This is by default set to the number of respondent in your sample. But you can set it to any number you like. The total number identifies the 'population' that we in optimal conditions would have information for. In step 2 of the wizard you will specify how your population mix should be split between your variables. If you promised a 1000 interviews but managed to collect only 950, you can weigh up the total by setting this number to 1000.
Min. deviation between iterations: This is an automatic stop that will overrule the number of iterations. If the deviation of each respondent's weight falls below this number then the algorithm will see convergence as having been reached.
Min. weight: If we do not allow any user to have a weight lower than a certain number we can set it here.
Max. weight: If we do not allow any user to have a weight higher than a certain number we can set it here.
Once we have set up these factors of the weighing matrix we will move to step 2 of the wizard, where we will be able to decide on how the optimal representation should be between the variables.
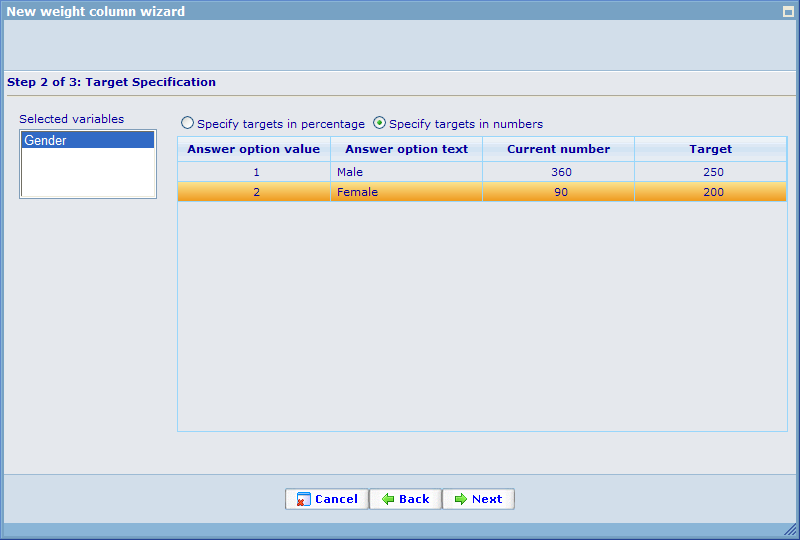
In this step you must specify how the 'total number' (population) you specified in step 1 of the wizard should be split between the option targets of each variable. In the above example the population we have is 450 and we have split it on 250 males and 200 females.
You must split the population for each of your variables. You can view how these inserted targets look in percentages by clicking the 'Specify targets in percentage' radio button.
Once you have split your population over all the variables and options you can click next. This will bring you to the final step of the wizard which will do the calculation of the weight for your set up algorithm and data. Please have patience since this may take a little time.
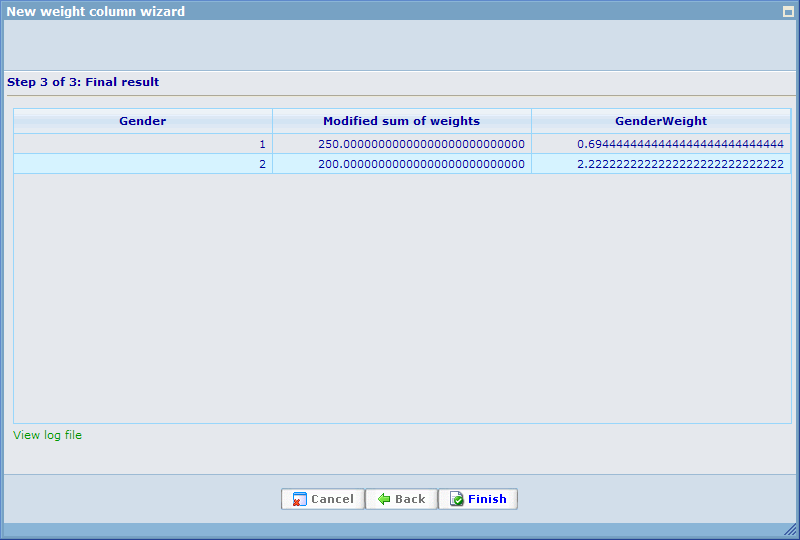
The columns and number of rows you will be introduced to will depend on your variables. For each possible combination of answers for the chosen option there will be calculated one weight. The final column will show the weight that will be used for that combination of answers. The column title is the name of your weight. The column on the left side of your weight is the 'Modified sum of weights' column which shows the modification of the total population based on actual respondents. This value is a pre-calculation to the final weights and can be ignored.
Should you agree on the results of the algorithm you must click 'Finish' to update the data cache. Each answer sheet in your data cache will thereby have inserted the appropriate weight into the weight column that you have created.
Notice that the adding/update of a weight column of the data cache will also automatically create/update a weight axis in the axis set. Even if you change the name of the weight column using this wizard, the related axis set column will also change it's specifications so it always corresponds.
To apply weights to your reports, please read the help files on the report module.


