Setting up delivery types
More actions
Setting up delivery types
In order to create a new delivery type you need to take the following steps.
From the “tools” menu in the lowest left corner of your screen, select Catalogues -> Delivery Types
You will be presented with an interface similar to the one shown in the image below:
This interface shows all the Delivery Types that exist in your system. Of all the Types, there is only one which is set default, as you can see in the second column. Each Delivery Type has a number of countries in which the Type is used. You can see the number of countries in the third column of the list. The fourth column shows whether the type is active or not. If a Type is not active it will not be available for customers using the web shop to choose, even when the Type has been chosen to be used in the country intended to deliver.
- If you want to add a new Delivery Type you should click the “Add” button.
- If you want to view or edit a Delivery Type you should highlight it from the list and click the “Edit” button.
- To delete a Type, highlight a record in the list and click the “Delete” button. You can only delete Delivery Types that have never been used in connection with an order. If you no longer wish to support a Delivery Type you should just deactivate it.
- The “Close” button will close the dialogue.
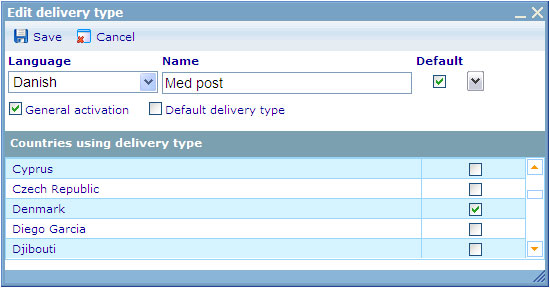
When you open to view or edit a Delivery Type you will be presented with the following dialogue.
Since a Delivery Type can be used in different countries we will also need the flexibility to show the options in different languages. If customers log in that are stated to have a different language than the ones for which you have specified values, they will be shown the default language value. The default value is chosen by clicking the “default” check box on the right.
In this dialogue you must give your Delivery Type a unique name. If you would like the Type you are creating to be available in the web shop, then you must set it to General activation. You can also set a default delivery type so that this Type will be the initially suggested delivery method for the web shop customers.
Finally, you can select the countries in which the Delivery type will be used. Shoppers will only be offered delivery types that are available for the country to which they wish to send their merchandise.


