Understanding the explorer field and the light resource search dialog
More actions
Understanding the explorer field and the light resource search dialog
There are many pages, lists and dialogs in which we need to choose a resource. Typical places are adding a user or group to the access tab, specifying the user who is responsible for a task, choosing the parent (path) of a new resource or adding users to the list of people to receive an e-mail.
One of the most common fields you will see in the system for choosing a resource is the explorer field shown below.
The buttons available for any specific explorer field may vary from place to place, but 4 of the most common buttons for the explorer control are the ones you see in the image. We will explain each of these in turn below. Three of them just need short explanations whereas the "Search for resource dialog" is explained in more detail.
The "Set default resource" button: There may be fields in the system where you more or less always want to point to the same resource. You can therefore some places choose to always have a default value when creating a new object in that location. To create a personal default in resource fields just click the small Tablet button next to the explorer field.
The "Create resource" button: Sometimes the existing resource may not be the ones you need for the explorer field. Then you can click this button to create a whole new resource. When you save the new resource it will automatically be inserted into the explorer field.
The "Open resource" button: Once you have inserted a resource into the explorer field, you may want to edit it or investigate it further. This can be done by clicking the open resource button.
Light resource search dialog
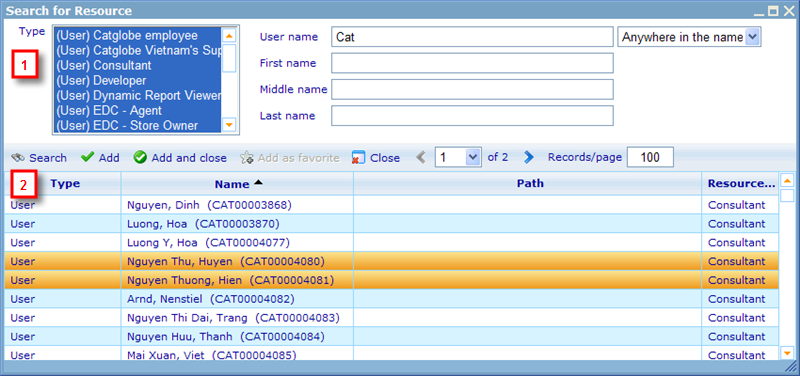
This is probably the most used dialog in the system. It is the dialog that makes it possible for you to find and select the resource(s) you need to add to an explorer field as well as other lists and fields in the system. The dialog consists of two main areas as shown below.
Area 1 is the search criteria. On the left you have the available resource type and resource template type choices that exist. To make the search faster choose only those that cover the resources you need. On area 1's right side are the search criteria that apply to the resource types you choose on the left side. In the above example the user has chosen to search for only users, thus the available search criteria will be user name, first-, middle- and last name. If you had chosen to search for both users and groups the only common search criteria would have been "name" (used for user name as well as group name).
Once you are satisfied with your search criteria you must click the "Search" button in area 2. This will start a search for the resources fulfilling your stated search criteria and show these in the area 2 list. You can now choose to highlight the resource that you were looking for. Notice that the option of multiple highlights depends on whether you are adding resources to a field or a list. If you are adding to a field that accepts just one entry, then you will be limited to only highlight one resource.
The availability of the button "Add" will also depend on whether you are allowed to add one or more resources in the interface where the dialog was opened from - the "Add" button is hidden if you can just add one. If you on the other hand are adding multiple resources in the current session you can use the add button to insert the chosen resources in the background and then continue searching for other resources you need to add. When choosing the last resource you want to add you can click the "Add and close" button which will close down the dialog as well as insert currently highlighted resource(s).
The "Add as favorite" button will add a resource to your list of favorites. Please click here to understand the use of favorites, which is a useful feature in relation to the explorer field.
From version 5.6 we have added a number of keyboard shortcuts which should make the light resource search control quicker for experienced users. These are:
|
Shortcut key |
Action |
|
TAB |
Move forward between buttons and list records in the control |
|
SHIFT + TAB |
Move backwards between buttons in the dialog |
|
CTRL + Q |
Click the close button |
|
CTRL + ALT + PLUS SIGN |
Maximize when the dialog is restored, or Restore when the dialog is minimized |
|
CTRL + ALT + MINUS SIGN |
Restore when the dialog is maximized, or Minimize when the dialog is restored |
|
ENTER |
Start searching when the focus is on an input control to specify search criteria, or Add & close the current resource when the focus is on the search result list |


