Difference between revisions of "Personalization"
| Line 89: | Line 89: | ||
== User preferences == | == User preferences == | ||
| − | In the user list, you can edit the my setting of the selected user through Edit -> User preferences. <br> | + | In the user list, you can edit the my setting of the selected user through Edit -> User preferences. <br> |
| − | [[Image: | + | [[Image:User preferences.jpg]]<br><br> |
However, there's 1 note that these options on user's setting are only available when the selected user has navigation accesses to access to them.<br> | However, there's 1 note that these options on user's setting are only available when the selected user has navigation accesses to access to them.<br> | ||
| Line 97: | Line 97: | ||
== Mass update preferences<br> == | == Mass update preferences<br> == | ||
| + | The mass preference update wizard can be found under Tools-> Administration -> HR -> Mass preference settings. It will open a wizard where you in step 1 must choose the users for which you wish to update preferences.<br> | ||
| + | [[Image:Mass_preference_step_1.jpg]]<br> | ||
| − | + | You can choose to search for users using the search button. One of the more popular filters here is 'Member of group' which is the way that you can succeed in giving preferences to all the members of a specific group. If you only want to update preference for only some of the users returned from your list you can choose to highlight these and select "All highlighted users". If you just want to update preference for the complete list of returned users you choose "All users that fully meet the search criteria". | |
| − | + | Finally you need to select which preferences it is you wish to update. When you are satisfied with your selections you should click next. This will bring you to a screen very similar to the My Settings dialog. Simply choose the settings that the chosen array of users from step 1 of the wizard should have for all the preference tabs and then click the finish button to finalize the mass update.<br>[[Image:Mass_preference_step_2.jpg]] | |
| − | + | == Default resource on REX control<br> == | |
| − | + | There may also be fields in the system where you more or less always want to point to the same resource. You can therefore some places choose to always have a default value when creating a new object in that location. To create a personal default in resource fields just click the small button illustrated in the image below. <br> | |
| − | [[Image:Notification.jpg]] | + | [[Image:Set default.jpg]] |
| + | |||
| + | After the resource is set as default, a notification at the bottom of the Tools menu is shown<br> | ||
| + | |||
| + | [[Image:Notification.jpg]] | ||
<br> | <br> | ||
<br> | <br> | ||
Revision as of 10:07, 6 August 2010
Contents
PERSONALIZATION
My settings
Under Tools->Personal you will find a link to My settings. This will open a dialogue with a number of tabs to personalize your Catglobe pages. In order to change anything on these tabs you must first update the page and then click the Apply button to activate the changes.
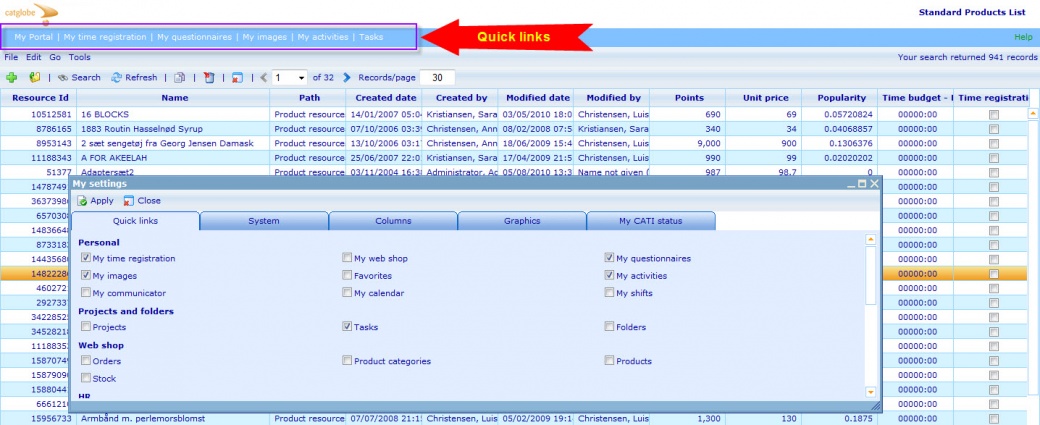
My settings - Quicklinks
Quick links are the links show in the top tool bar. You are allowed to have a maximum of 5 links (not include My portal) there and can choose among the ones listed in this tab of 'My settings'.
My settings - System
The system tab provides 2 different options:
- "Show all menus in tools" : is whether you would like to see all elements in the Tools bar (including those you have no navigation access to) or just the ones you are allowed to use.
- "Auto inform options" : defines the communication methods in which you prefer to be contacted by the system with important information. There are 4 possible ways currently :
- E-mail: the email will be sent to the email address of the users.
- Informer : The informer message will be sent to the users when there's somthing new to them everytime they log in to the system. They can read the informer through :
- The informer application
- The "informer messages" in "My communicator"
- Web informer
- SMS
- Web informer
- E-mail: the email will be sent to the email address of the users.
My settings - Columns
It is possible to choose exactly the columns that you prefer in all resource lists to hide or display. On this tab it is possible to reset all your resource lists so no columns are hidden anymore
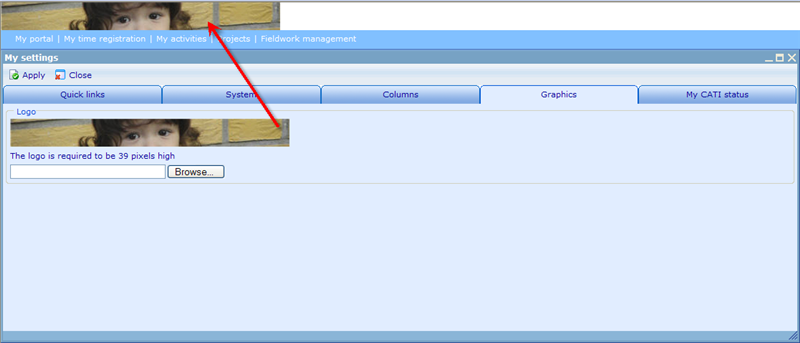
My settings - Graphics
It is also possible to choose your own logo in the top left corner. Just browse for the image you would like to upload (must be 39 pixels in height) and click apply.
My settings - My CATI status
On this tab you can set the time frame applicable for 3 My portal objects
My shifts will define the number of days in the future for which shifts you have signed up to will be shown on My Portal.
My hours will define the number of days in the past for which the work on CATI assignments will be presented on My Portal.
My performance will define the number of days in the past for which your personal performance on CATI assignments you have participated in will be shown on My Portal.
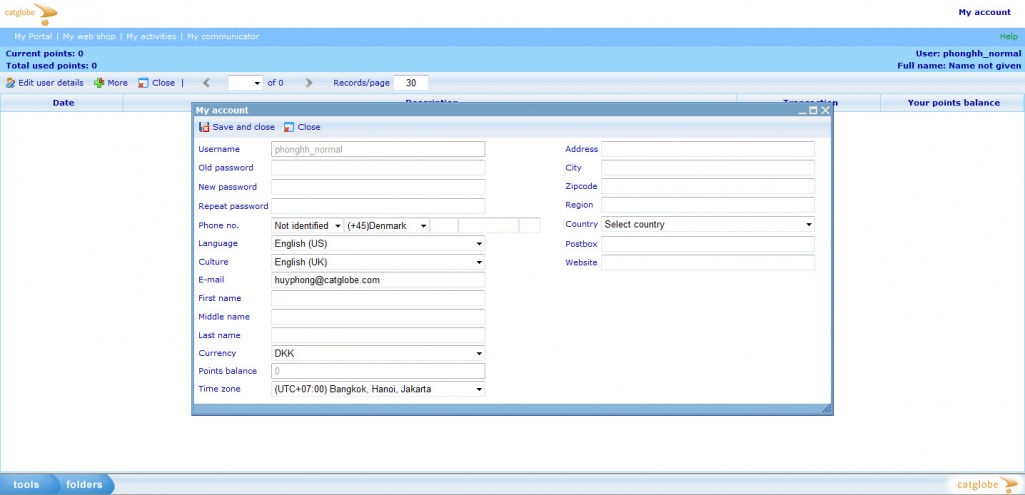
My account
Under Tools->Personal you will find a link to My account. When this page is opened, "Edit user details" feature allows user change his information,e.g. password, phone number, email, address, etc although he doesn't have resource access to his user account.
My favourite
Under Tools->Personal you will find a link to My favorites where you can manage your list of favorites. Here you can open any favorite resource or remove them from your list of favorites.
Add a new favorite to "my favorites" list
From any resource list in the system you can highlight a record and add it to your personal list of favorite resources.
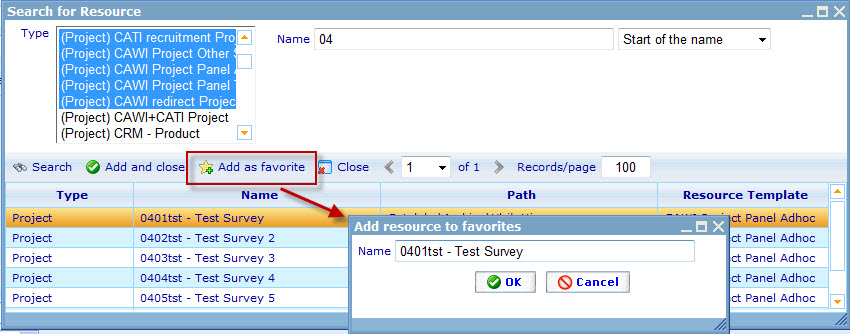
Once you add it you will be asked for a unique favorite name. By default the current resource name is proposed, so you normally only need to click the 'OK' button.
There is another way to add resources to favorites as well, namely from any light search control. When opening the light search control,you will notice a small star button (as illustrated below). When clicking this, the resource chosen in the search result will be updated to be a favorite resource.
Auto-suggestions for resource fields
The advantage of favorites is that they are used for auto-suggestions for the resource field. There are many places in the system where you will need to choose what resource in the system you want to 'point to'. This could e.g. be in a task where you wanted to choose which responsible should perform the task. Instead of having to search for the applicable user who should be responsible each time, you can take advantage of the suggestion feature, which tries to guess which resource you want to use, when you write something directly into the text field. The resources that will be suggested are those which exist in your list of favorites or which were among the 20 latest resources that you have used. The example below shows the text box suggesting resources that contain to the characters you have typed
To choose a favorite to insert just use the down arrow until you reach your preferred record and click return.
My portal
User preferences
In the user list, you can edit the my setting of the selected user through Edit -> User preferences.
However, there's 1 note that these options on user's setting are only available when the selected user has navigation accesses to access to them.
Mass update preferences
The mass preference update wizard can be found under Tools-> Administration -> HR -> Mass preference settings. It will open a wizard where you in step 1 must choose the users for which you wish to update preferences.
You can choose to search for users using the search button. One of the more popular filters here is 'Member of group' which is the way that you can succeed in giving preferences to all the members of a specific group. If you only want to update preference for only some of the users returned from your list you can choose to highlight these and select "All highlighted users". If you just want to update preference for the complete list of returned users you choose "All users that fully meet the search criteria".
Finally you need to select which preferences it is you wish to update. When you are satisfied with your selections you should click next. This will bring you to a screen very similar to the My Settings dialog. Simply choose the settings that the chosen array of users from step 1 of the wizard should have for all the preference tabs and then click the finish button to finalize the mass update.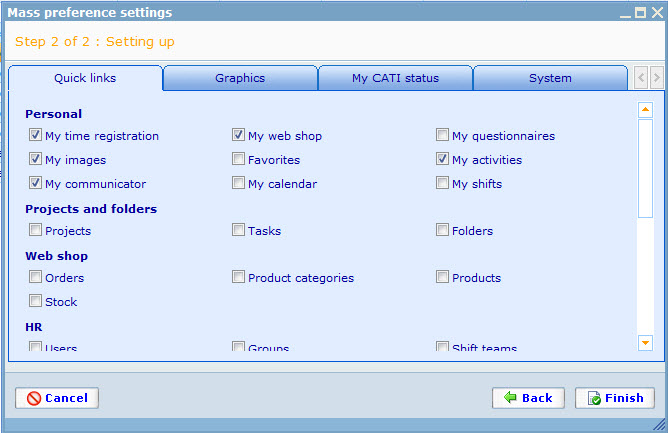
Default resource on REX control
There may also be fields in the system where you more or less always want to point to the same resource. You can therefore some places choose to always have a default value when creating a new object in that location. To create a personal default in resource fields just click the small button illustrated in the image below.
After the resource is set as default, a notification at the bottom of the Tools menu is shown

