The tester tool
More actions
The tester tool
To make it easy for testers to carry out testing the test cases we have created the tester tool! This can be found at Tools -> Projects & Folders -> Tester tool.
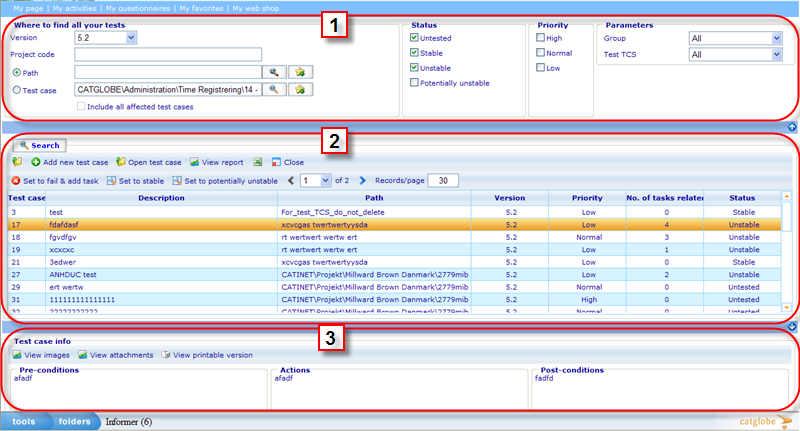
The tester tool page consists of three parts. We will explain each part in turn below.
1: The search area
The top area is used to find exactly those tests that we want to work on. The filters we have to perform the search are:
Version: Choose which version you want to see tests for.
Project code: If you consistently have entered identifiable codes for all test cases you can return test cases based on their relationship with a project.
Path: If you wish to return only tests from test cases placed in a certain path in the system. It will also return from children resources of the chosen path.
Test case: If you want to return one specific test case you can search for it using the light search control.
Include all affected test cases: In case you choose a value in 'Test case' you can also ensure the search returns any test case related to the chosen one via it being affected by the status of the aforementioned.
Status: Choose among the 4 available statuses here. You can search for more than one status at a time.
Priority: Useful search criteria when you want to focus on high priority tests first!
Parameters: It is possible add customized variables to test cases and also search tests based on these!
When you have put together your required search filters please click the Search button placed on top of area 2.
2: The test list
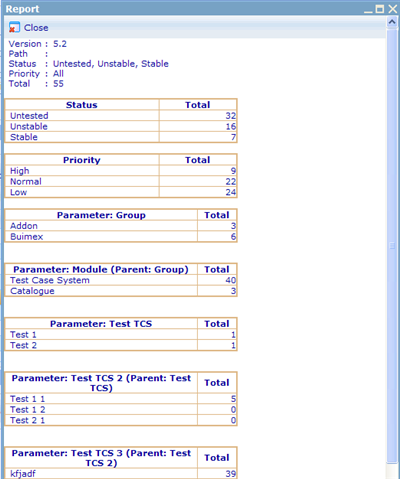
After having searched you will here be presented with all the tests that fit your search criteria. You can here also add new test cases, open the tests or the test cases from where the tests came or export the list to excel. It is also possible to make a report on the returned lists of tests. When clicking the 'View report' button you will be shown the dialogue below.
The report will show you how the tests in your list are split out on a number of variables, namely Status, Priority, and any parameter related to the test cases.
Under the top tool bar there is a second tool bar with status actions you can take on the listed tests. These buttons are explained in turn below:
Set to fail and add task: can be used on tests of any prior status and will generate one open bug (as a task) related to the test. Notice that you can only choose between those types of tasks that are allowed to be used for test cases. This state is set for a task type in resource templates.
Set to stable: can be used on tests with prior status: untested and potentially unstable. If you want to set tests that are unstable to stable, you simply make sure to complete all related tasks. This will automatically change the test status to stable.
Set to potentially unstable: can be used on untested and stable. Normally this status is set by the system when it presumes a test case may have become unstable.
3. The test case detail area
Whenever you highlight a test in the test list the information of that test will be shown in this area. This will ensure that you do not need to open each test in a new window to know what you need to do to test it. You can simply highlight one test at a time, test it, then set the status of it, and proceed to the next one.


