Layout tab - The dashboard editor
More actions
Layout tab - The dashboard editor
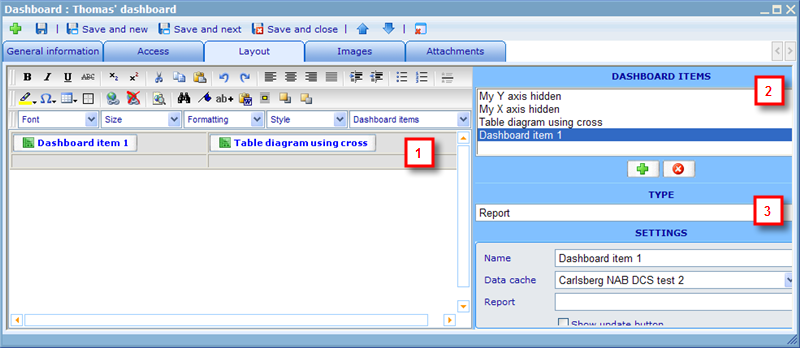
The layout tab of the dashboard is where you add and edit the elements of the dashboard as well as set up the graphic and place the elements of the dashboard. The dashboard editor has three main areas as illustrated below.
Area 1 is the HTML editor: This features the standard HTML editor buttons and features. Important ones to notice among these are;
- the "Add image" button, which will insert your images from your image tab to your editing area
- the "Insert new table" button, which will help you split up the screen in structured areas in which you can place your images and elements
- the "Dashboard items" drop down, which will offer you all the viewable elements from Area 2 (see further down to learn more) to insert into the HTML area
- the "Languages" drop down (next to dashboard item drop down - but not visible on the above image), which will make it possible to offer parts of the dashboard to be shown in the languages of the viewing users. To learn more on this please click here.
- The "hyperlink" button, which will make it possible to link users to other web pages. The page to where a user is sent can even depend on which group he belongs to. To learn more on this please click here.
Area 2 is the dashboard element list: This shows all the elements you have added so far. By highlighting any item in the list, then the form in Area 3 (see further down to learn more) will be updated to show the information of that element. The add and remove button under Area 2 can be used to add new or remove existing elements on the list. When adding a new element it will be given a default name. You will in Area 3 be able to update this name as well as choose other required specifications of the new element.
Area 3 is the dashboard element detail form: This form will show the details of any dashboard element you choose in Area 2. Two things are common for all dashboard elements. First one is name, that needs to be unique for the dashboard. The second one is choice of element type. The dashboard supports a large number of different element types and will in the coming versions add even more. In the bottom of this page you will find links to help files on each of the existing element types.
Some of the important logics to notice on how the three areas work together and how the saving process works is:
- There exist two types of elements; hidden and viewable. You need to insert all viewable items into area 1 before you will be allowed to save. Hidden items cannot be inserted into the HTML area, since these items do not have a viewable part to them.
- You must update all required information of one element before you can proceed to add other elements.
- The relationship between elements is specified inside the elements. To learn more on this please also read the below pages.
Back to: Layout

