Setting up the questionnaire
More actions
Setting up the questionnaire
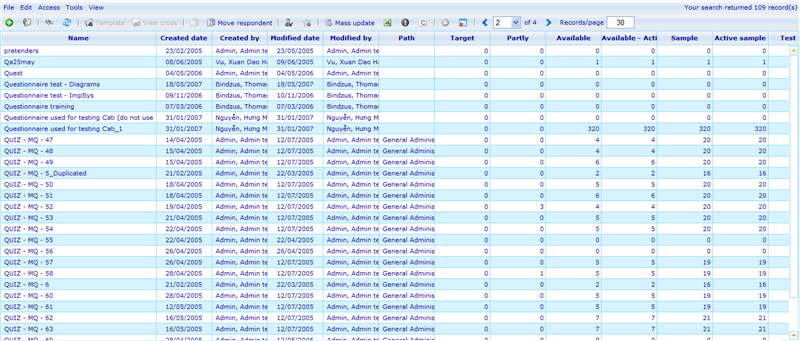
You can access the questionnaire resource list via Tools->Questionnaires->Questionnaires! You will be introduced to a list similar to below:
From here you can use the normal resource features and a number of features specific for questionnaires. Below we will explain the questionnaire specific features. Those that are common for all resources you can read about by clicking here!
The basic features of adding and editing questionnaire resources is explained further down in this file, so if you immediately want to know more about this by going to the chapter 'Adding questionnaires' further down in this page. From the menus you can choose a number of features besides the normal ones, these will shortly be introduced here:
Test link: This will open a dialog where you can make test links. Please click here for more information.
Delete all test links: This feature makes it possible to quickly delete all test links related to a questionnaire.
Question group: This will open the dialog where you can manage the question groups of a questionnaire. Please click here to learn more!
Statistics: This will lead you to the dialog where you can manage how data is analysed for the questionnaire. To understand this feature in more depth please click here!
Open CATI live monitor: This will open the dialog for managing questionnaires used for CATI. To learn more on CATI and the features in this dialog please click here!
Interview manager: The interview manager opens a window that will give you a quick view of the status of the questionnaire.
This is an alternative view to other places you can get similar information, but it bundles a lot of popular features in one view. Shortly explained, the dialog shows the list of completed and partly completed questionnaires. For the fully completed questionnaires you are allowed to reset them (set starting point back to first question) or both reset and delete data (meaning that any data they added in the partial completion initially will be removed). For the list of partly completed questionnaires you are also allowed to open them to 'help' fill them in. Finally there are two button that allow you to instantly create additional answer sheets; one that creates anonymous sheets and one that creates test sheets.
CGScript prompt: This will open a dialog where you can quickly analyse or affect questionnaires using CGScript. Please click here to learn more!
Preview: The questionnaire previewer can be accessed from both the template editor as well as from the questionnaire list. Please click here to learn more on the previewer and how it works.
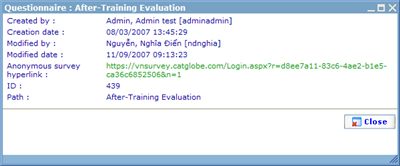
Information: Will show you some general information on the questionnaire. Especially important is the information on 'Anonymous survey hyper link'. Please click here to learn more on how it can be used for what we call recurring links.
View filter: This feature gives an overview of filters and conditions of a questionnaire. Click here to learn more!
View report: You can get an instant report of the newest data of the questionnaire by using this link. If a report has earlier been created for this questionnaire using this link you may have to decide on whether you want to rebuild parts of the report before viewing the data.
View cross: From the questionnaire list it is possible to choose 'View cross' to analyse the data that has been made for the questionnaire so far. This may take a little time since the data cache that is a prerequisite for a cross diagram may need to be built beforehand. If you have used the cross feature earlier with the same questionnaire, then you will be offered to reuse the earlier data cache or create a new one. Navigation access is required before you will see this feature. Please click here to learn more about cross diagrams.
Move respondent: The feature makes it possible to quickly move a set of respondents from one questionnaire to another. Click here to learn more!
Constants: Constants make it possible to personalize questionnaires even more. Click here to learn more!
Invite respondents to participate: A simple way to invite respondents after having set up the questionnaire. Rather than having to make samples, build them, make a bulk mail, and then send it; this wizard takes care of all of this at once. Only thing required is that you have a questionnaire ready. Click here to learn more!
Some of the columns that exist in the questionnaire list and which are interesting to understand are explained in detail below:
Target: Specifies what the target number of respondents we hope to get for the questionnaire is. This column is not really actively used as anything but a reminder to the reader. Actual targets are managed as quotas and in the sample builder module.
Test link: Shows all the answer sheets related to the questionnaire that were used for testing.
Test mode: This column can directly be checked. When checked the questionnaire will go into 'Quota test mode', meaning that quotas will also be filled up with answer sheets for testing. Please read more on quotas to understand the test mode status.
Estimated single interview time: The estimated time in seconds that one interview with a respondent will take for the specified questionnaire. Please read the file on time estimations to learn more.
Estimated total interview time: The estimated time in seconds that it has taken to interview respondents for those answer sheets which have currently been completed. Notice that this number normally is, but does not necessarily need to be, 'estimated single interview time' times 'completed questionnaires'. If the estimator matrix changed or questionnaire changed the value will not be changed historically for those answer sheets that were already completed using earlier measurements.he estimated time in seconds that it has taken to interview respondents for those answer sheets which have currently been completed. Notice that this number does not necessarily need to be 'estimated single interview time' times 'completed questionnaires'. Please read the file on time estimations to learn more.
Status: You can directly set the status of the questionnaire in the resource list or do it in the questionnaire dialog. The statuses that you can choose between are Open, Paused, Closed and Open for Test. Closed and paused questionnaires deny questionnaire to be filled in for both normal answer sheets as well as test sheets. Open for test deny normal answer sheets to be filled in but still allows you to fill in test sheets.
Adding questionnaires
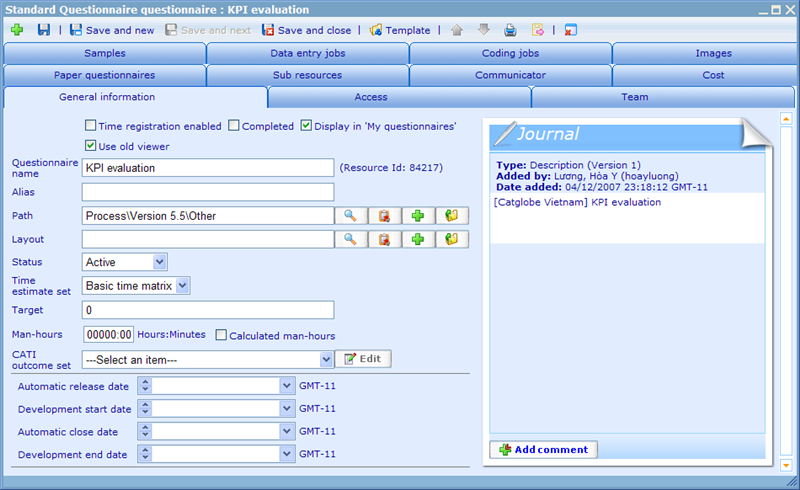
When adding questionnaires you will be presented with the standard resource dialog. Many of the features in this dialog are presented under the managing resources files. The features that are unique to the questionnaire module are explained below.
Some of the important information to specify on the core information tab of the questionnaire resource are:
Completed: If completed is set then coding jobs of the questionnaire will no longer be offered to coders.
Display in my questionnaire: Decides whether or not the questionnaire will be shown in my questionnaires, which is a list of all the questionnaires that the logged in user needs to answer.
Use old viewer: Since a new viewer was made for version 5.7, it has been deemed necessary to offer the old viewer in case there are questionnaires made before version 5.7 that will not work in the new viewer. By default all old questionnaires will have been set to use the old viewer. When making new questionnaires you should always leave it unchecked.
Name and alias: Since the questionnaire is shown many places and we do not always want the client to see the same name as used internally, we can choose to give the questionnaire a user friendly alias. If no alias exists then users will see the questionnaire resource name.
Path: When you create a new questionnaire you of course need to give it a path. If you choose to generate a new questionnaire template at the same time, you must also choose what path this template will have. You here have two choices; either to specify the exact location for the new template or simply have it become a child of the new questionnaire you are creating.
Layout: The layout of the questionnaire you are using is decided by the layout that is associated with it. To learn how to create layouts for use in the questionnaire module please click here.
Status: You can directly set the status of the questionnaire in the resource list or do it in the questionnaire dialog. The statuses that you can choose between are Open, Paused, Closed and Open for Test. Closed and paused questionnaires deny questionnaire to be filled in for both normal answer sheets as well as test sheets. Open for test deny normal answer sheets to be filled in but still allows you to fill in test sheets.
Time estimation method: Decides the method used to evaluate how long time it will take to answer the questionnaire. Please read the file on Questionnaire Analysis for more information.
Target: This value describes to yourself and others the number of successful interviews you hope will be a result of the survey carried out for the questionnaire. The number does not have any system implications. If you would like to set up targets of sample groups or quotas and stratification you must refer to these specific files.
CATI outcome set: If you want your questionnaire to be used for CATI you are required to choose an outcome set. This set explains what possible outcomes a CATI call can have. Please read more on outcome sets by clicking here!
The tabs that are special for questionnaire are explained in separate files; find these by clicking in the below links:
Samples: Click here!
Coding jobs: Click here!
Paper questionnaire: Click here!
Constants: Click here!


